Setting up a WordPress website can be laborious and time-consuming. Fortunately, it is made much easier with the help of docker-compose on Ubuntu 20.04. This tutorial introduces how to install and dockerize a WordPress application using docker-compose in this environment so you can get your website running as soon as possible.
What is docker-compose?
Docker-Compose is a tool for defining and running multi-container Docker applications. With Compose, you use a YAML file to configure your application’s services. Then, with a single command, you create and start all the services from your configuration.
Let’s say you have an application which uses both Nginx and MySQL so instead of creating 2 different containers using 2 different Dockerfile we can build images, run containers and can define the services using one docker-compose file.
In this blog, we will learn how to install and configure docker-compose on Ubuntu 20.04.
Installing Docker and docker-compose
Step 1: To install docker on your system you can follow our previous article to install docker in ubuntu 20.04 How to install docker in ubuntu 20.04
Install the docker-compose latest version
Download Docker Compose package
Check out the latest release of docker-compose on this page https://github.com/docker/compose/releases and modify the version of docker-compose in this command at the time of installation the latest release was 2.7.0.
Create a directory in our system
mkdir -p ~/.docker/cli-plugins
Curl the repo using the given URL
curl -SL https://github.com/docker/compose/releases/download/v2.7.0/docker-compose-linux-x86_64 -o ~/.docker/cli-plugins/docker-compose
This command downloads the latest release of Docker Compose (from the Compose releases repository) and installs Compose for the active user under $HOME the directory.
To install:
- Docker Compose for all users on your system, replace
~/.docker/cli-pluginswith/usr/local/lib/docker/cli-plugins. - A different version of Compose, substitute
v2.7.0with the version of Compose you want to use. - For a different architecture, substitute
x86_64with the architecture you want
Step 3: Setup executable permission for docker-compose
chmod +x ~/.docker/cli-plugins/docker-compose
Check the version using the command
docker compose version
Configure a Docker-Compose File
Integrating WordPress with docker.
Deploying a sample WordPress application using docker-compose.
WordPress requires both web and database we can use the WordPress and MySQL image from the docker hub
Let’s create a new directory for WordPress.
mkdir wordpress
Create a docker-compose.yml file
vi docker-compose.yml
version: "3"
services:
  # MySQL Database image
  database:
    image: mysql
    restart: always
    container_name: wordpress_database
    environment:
      MYSQL_ROOT_PASSWORD: my_rootpassword
      MYSQL_DATABASE: wp_db
      MYSQL_USER: wp_user
      MYSQL_PASSWORD: wp_user_password
    volumes:
      - mysql:/var/lib/mysql

  # WordPress image based on Apache
  wordpress:
    depends_on:
      - database
    image: wordpress:latest
    restart: always
    container_name: wordpress_web
    ports:
      - "8000:80"
    environment:
      WORDPRESS_DB_HOST: database:3306
      WORDPRESS_DB_USER: wp_user
      WORDPRESS_DB_PASSWORD: wp_user_password
      WORDPRESS_DB_NAME: wp_db
    volumes:
      - "./:/var/www/html"

volumes:
  mysql:
Compose file breakdown.
Version
This is the first thing you need to add while creating a docker-compose file. Tells the docker which version of compose file to use.
Services
Which defines the containers to run in our case we need to deploy 2 containers.WordPress and MySQL.We can define our container under the services section as shown below.
services:

  #MySQL Database image
  database:

  #Wordpress image based on Apache
  wordpress:
Defining the service mysql_db
Image
The image which should be used to build the container. Here we are pulling the MySQL image from docker hub
Restart always
Tell the docker container to restart after a server reboot happens.
container_name
The name which you want to give to the database container.
Environment:
MYSQL_ROOT_PASSWORD: my_rootpassword
MYSQL_DATABASE: wp_db
MYSQL_USER: wp_user
MYSQL_PASSWORD: wp_user_password
The database environment consists of the MySQL root password and database name, username and password. WordPress will use these environment variables to connect to the MySQL container.
Volumes:
Used to map the data in the container to the host. Here we will map /var/lib/mysql which is the default data directory of MySQL in the container to the volume named MySQL.
Defining services of WordPress
depends_on
It ensures that a container only starts when the services it depends on are online. WordPress relies on the MySQL container, therefore, specify the depend_on as follows.
Image
The image which should be used to build the container. Here we are pulling the WordPress image with the latest tag from the docker hub
Restart always
Tell the docker container to restart after a server reboot happens.
container_name
The name which you want to give to the WordPress container.
Ports:
Mapping port 8080 on the host to port 80 on the container.
Environment
WORDPRESS_DB_HOST: database:3306
WORDPRESS_DB_USER: wp_user
WORDPRESS_DB_PASSWORD: wp_user_password
WORDPRESS_DB_NAME: wp_db
Volumes
They map the current directory to the directory containing the WordPress files in the container ie /var/www/html.
After creating this file run this command to build the image and run the containers.
docker-compose up -d
After the session has been completed verify the containers using the command.
docker ps

It must show a similar output as shown in the image above.
Run the Containers and Connect to WordPress
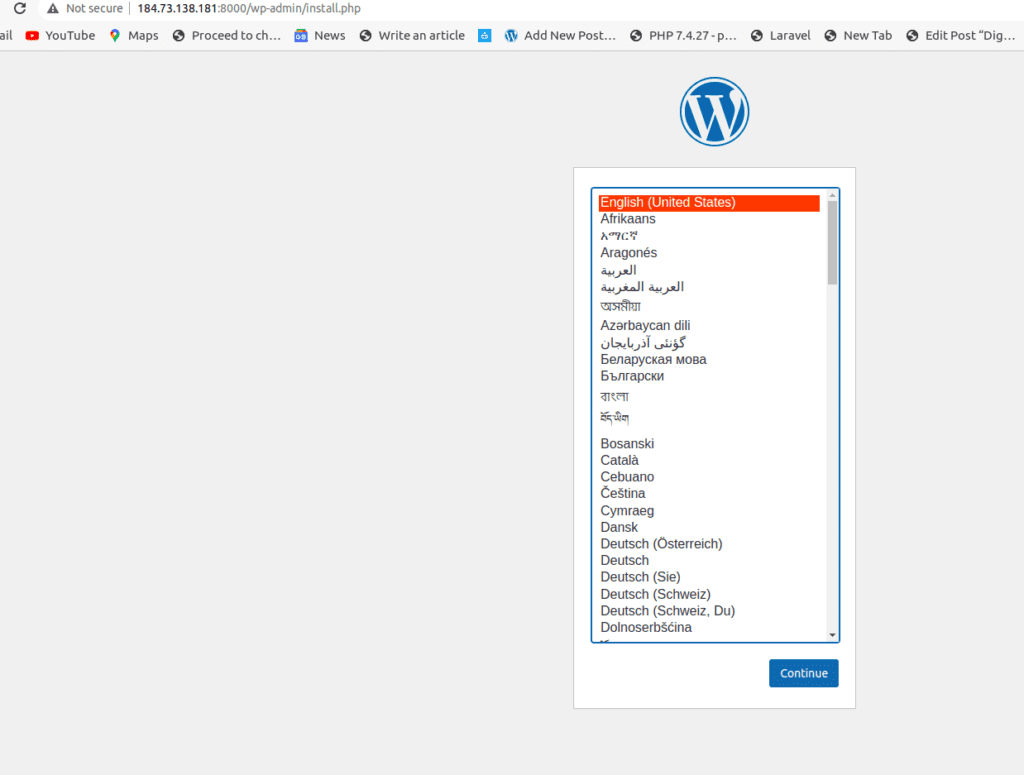
To verify the whether WordPress installation was successful please grab your server IP address and load <youripaddr:8000>.

So that we can confirm that we have successfully containerised WordPress with Docker-Compose.
Summary:
In this blog, we have covered how to install docker-compose on ubuntu and how to containerize WordPress using docker-compose.
Related blogs
How to build nginx image using docker file
How to run docker images as a container


